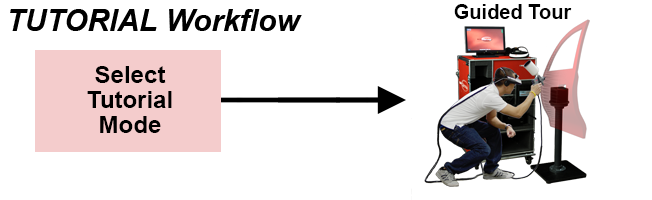
Tutorials provide guidance on proper painting technique and display on screen prompts to guide Users on how to use Feedback and Tools to develop key painting skills.
The image below describes the Tutorials workflow.

Tutorials provide guidance on proper painting technique and display on screen prompts to guide Users on how to use Feedback and Tools to develop key painting skills.
The image below describes the Tutorials workflow.
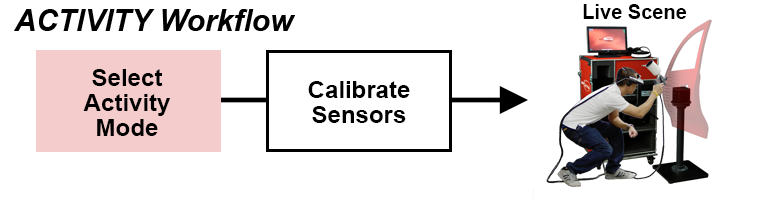
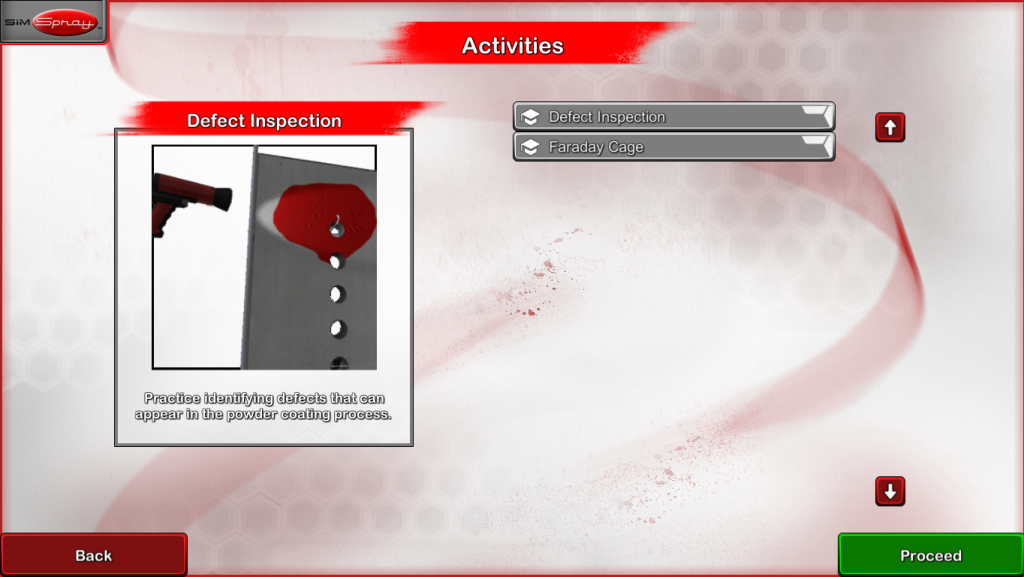
Activities give Users the ability to test specific skills in an interactive, controlled environment. Activities are performed in Activity Mode or as Lessons in Lesson Mode.
To perform an Activity:

Or
Instructors may add Activities to Courses from the Content Management portion of the Admin portal.
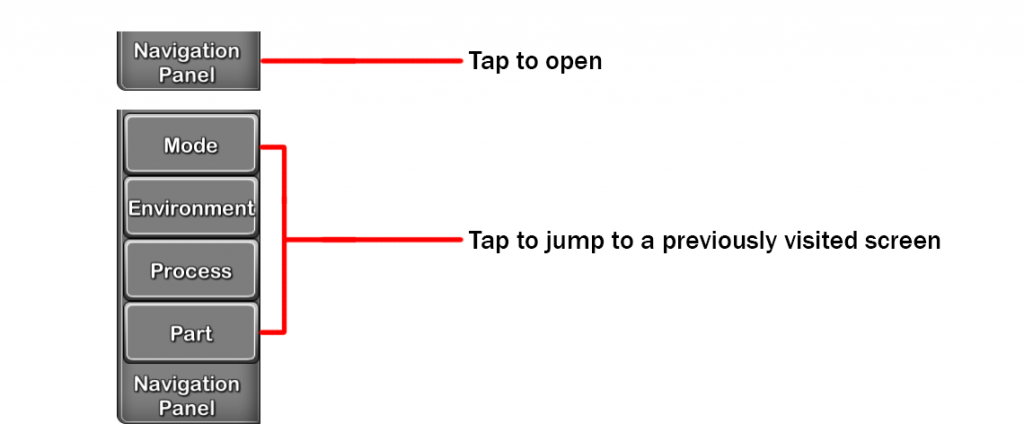
The SimSpray® operates with a Touch Screen Monitor. Most User Interface pages have both a Back button and a Proceed button that help Users navigate along a path.


The Navigation Panel located in the top, right corner builds a breadcrumb trail of pages visited so Users can easily jump to any of them.
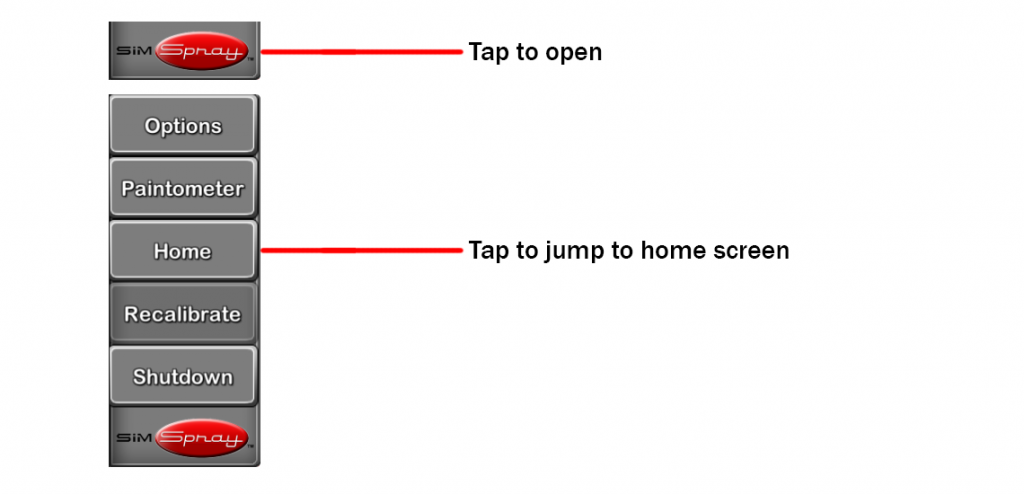
 The Home option under the SimSpray® tab takes Users to the Home screen.
Arrow buttons are available to scroll through available options.

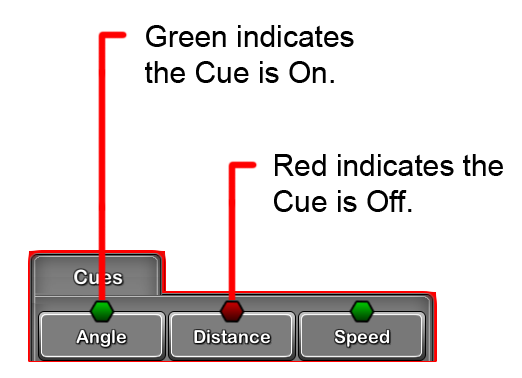
Toggle buttons are available to turn specific options ON or OFF.
Press the SimSpray tab (SimSpray menu) to access the following:
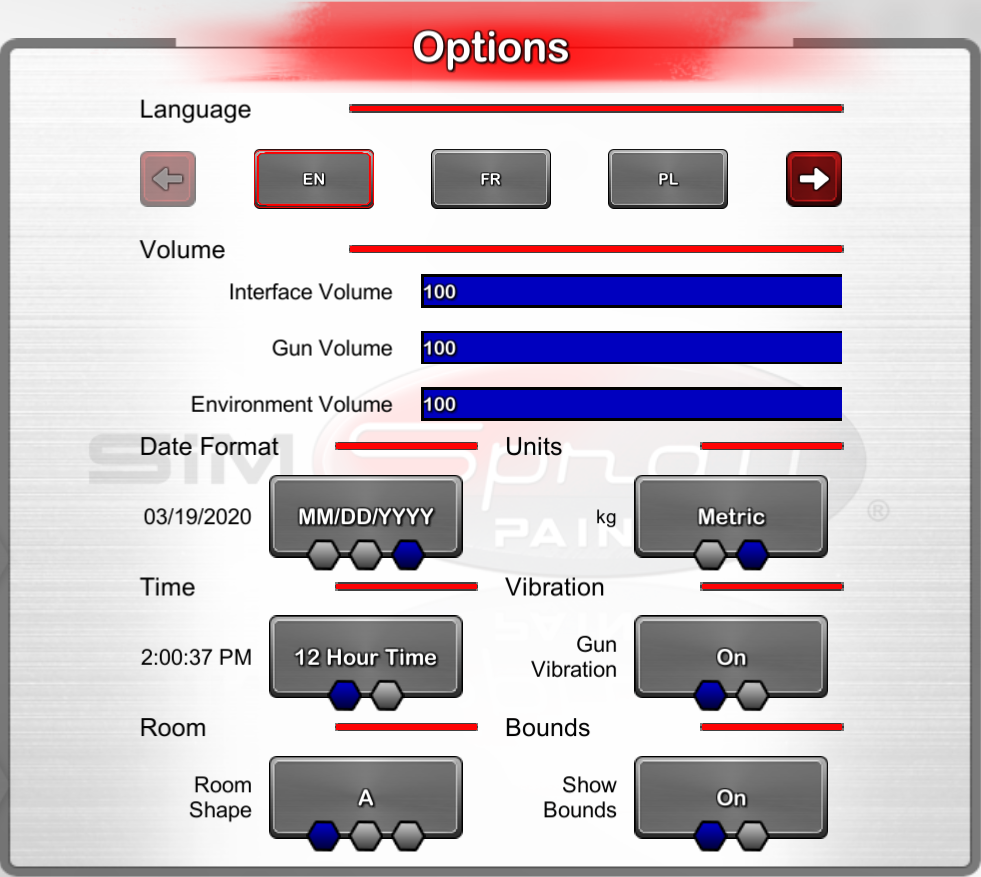
Note: the options you have available may differ depending on your software version.
Select from the following languages:
Adjust the Volume for the following items:
Toggle among different date formats.
Toggle among different time formats.
Note: requires 3.x software.
Toggle among different room shapes for smaller or larger motion tracking zones. See Tracking Options.
Toggle among different time formats, imperial or metric.
Toggle on or off the gun vibration when the gun is triggered.
Note: requires 3.x software.
Toggle showing the room shape bounds in the HMD (Head Mounted Display). When you are wearing your HMD in the motion tracked zone and get to the edge of the zone, blue line grids appear, indicating the edge of the motion tracked zone.
The Paintometer™ tracks time and environmental savings realized through usage of all SimSpray® Products. This information can also help you calculate your ROI (Return on Investment) from using SimSpray®.
To access the Paintometer™, select the SimSpray menu, and select Paintometer™.
Note: requires 3.x software. See Versions.
To view a summary of usage for a Product, select Basic Mode, and then select a Product.
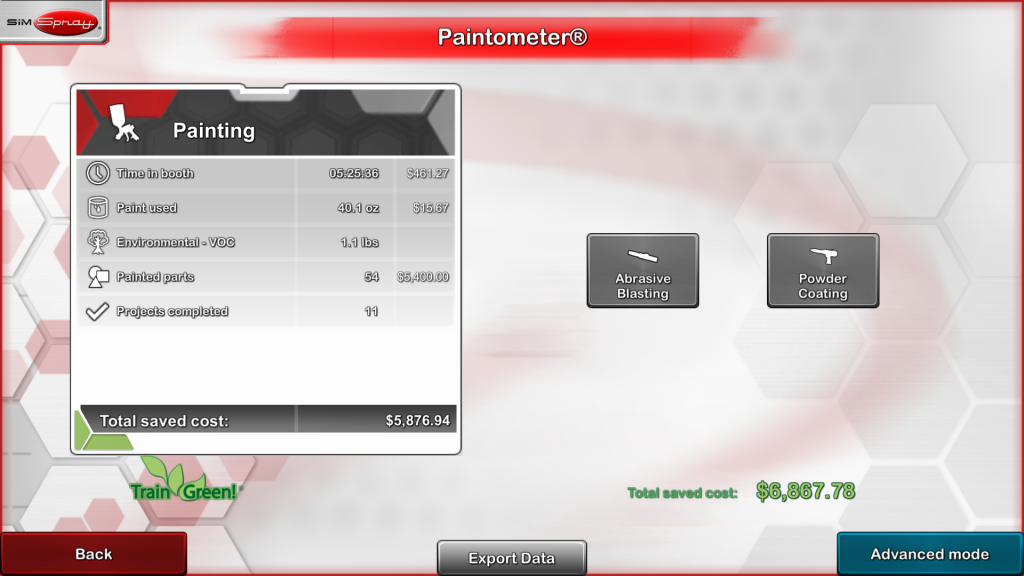
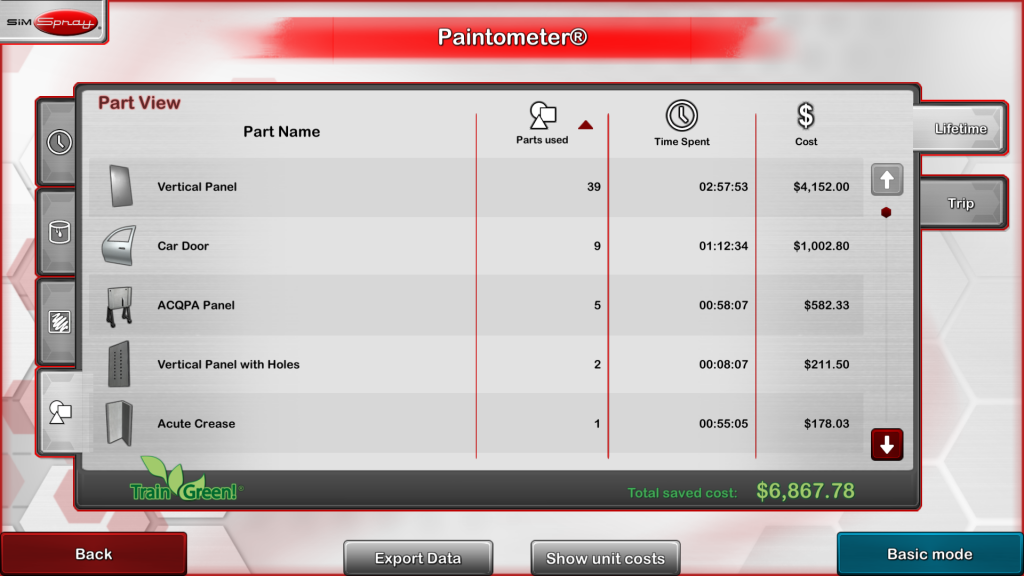
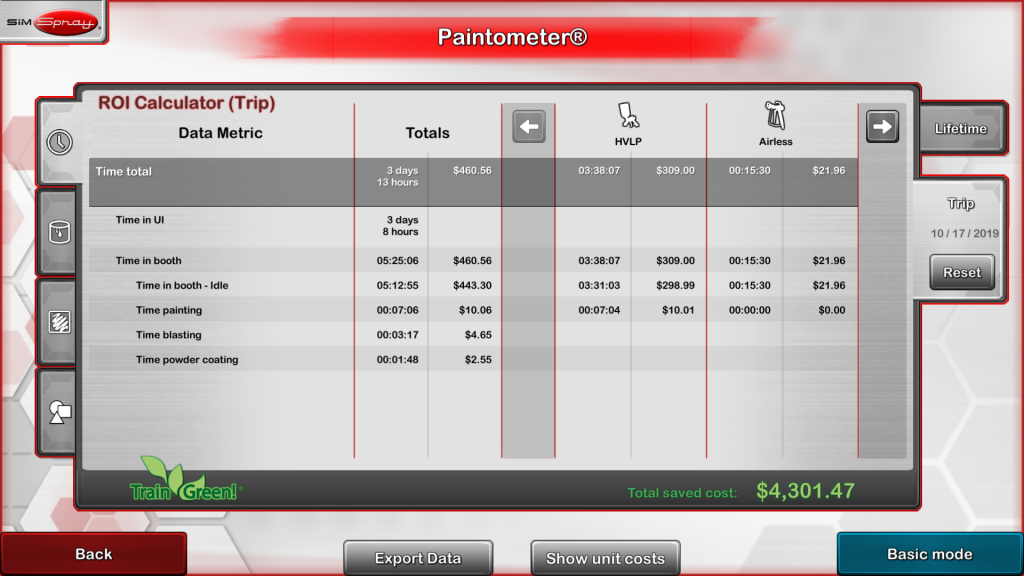
To see more detailed data for time total, material used, parts used, and per part info, select Advanced Mode. Then click on the tabs at left. Use available arrows to see all available info.
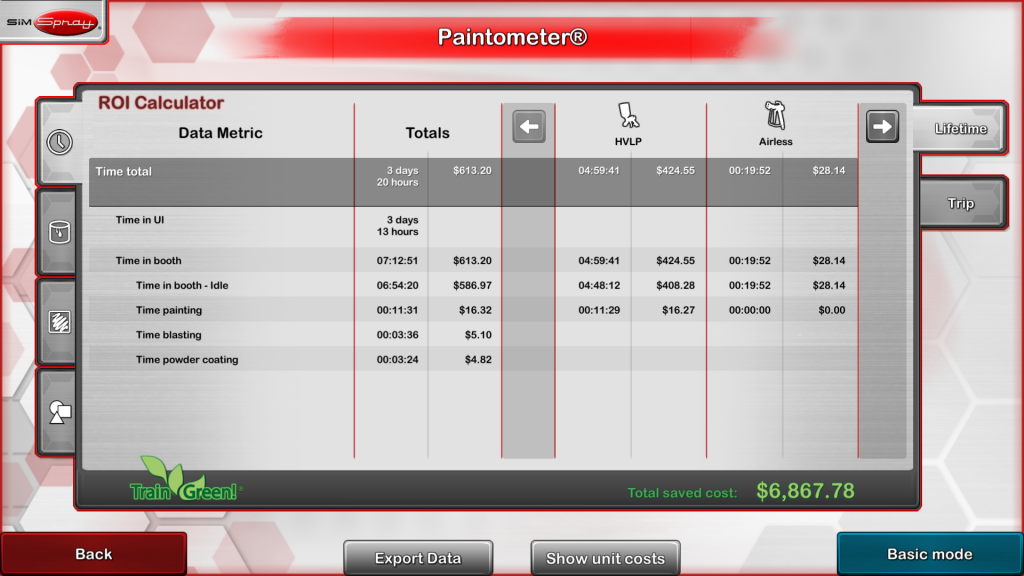
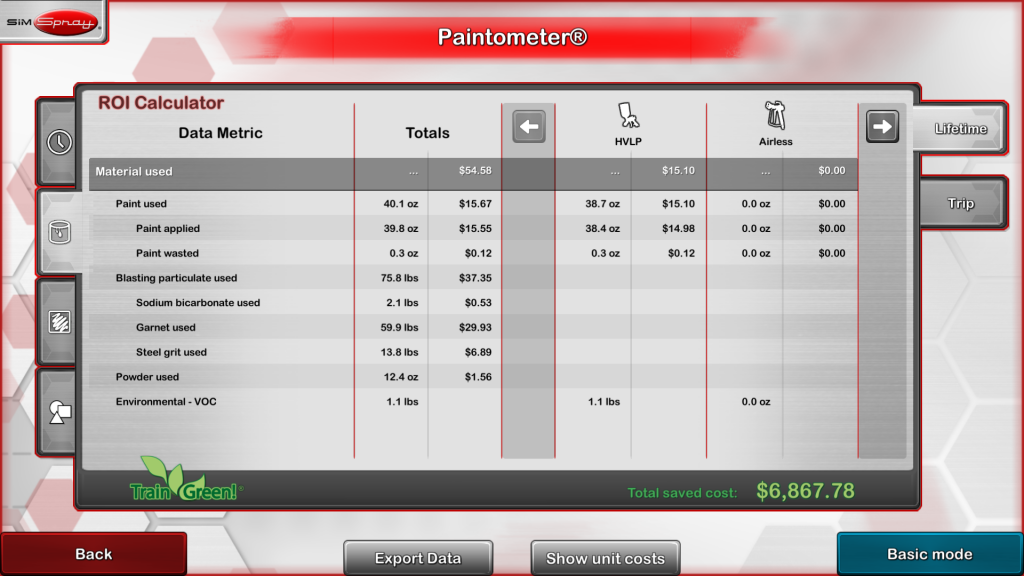
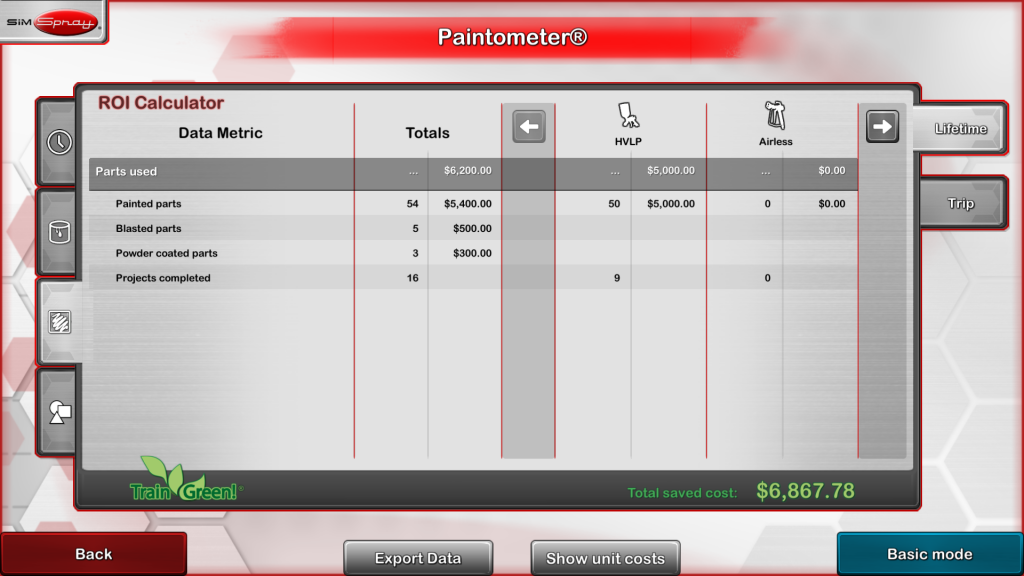
Lifetime tracks overall savings, and this continues to be tracked regardless of Resets. Totals shown are aggregated for all users. Select Lifetime to see this info.
Trip tracks until Reset is used. Select Trip and press Reset to clear tracking related to that Product and begin a new tracking period. This period will continue until the Paintometer™ is Reset again.
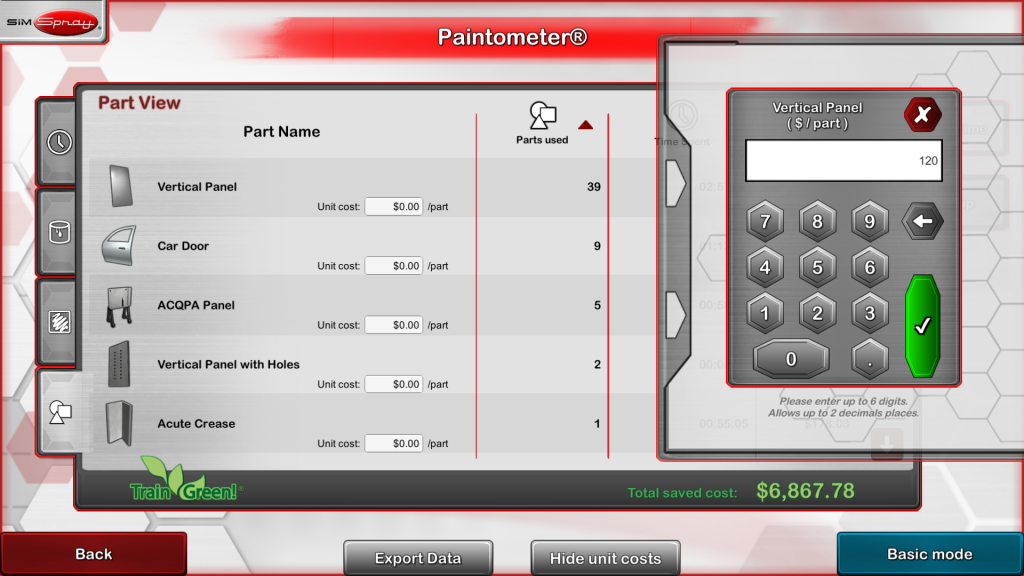
To customize the cost amounts from the defaults, select Show unit costs. Select any unit cost, a number entry will appear, enter a value, and confirm with the green, checkmark button.
Select Hide unit costs to hide the unit costs.
Connect a USB flash drive at the front of the SimSpray unit, and click Export Data to export the Basic Mode’s summary of information. This info can be imported into a spreadsheet program on a non-SimSpray computer.
Press Back to exit the Paintometer™.
Note: requires 2.x software. See Versions.
Select a Product Category to view tracked usage for that Product.
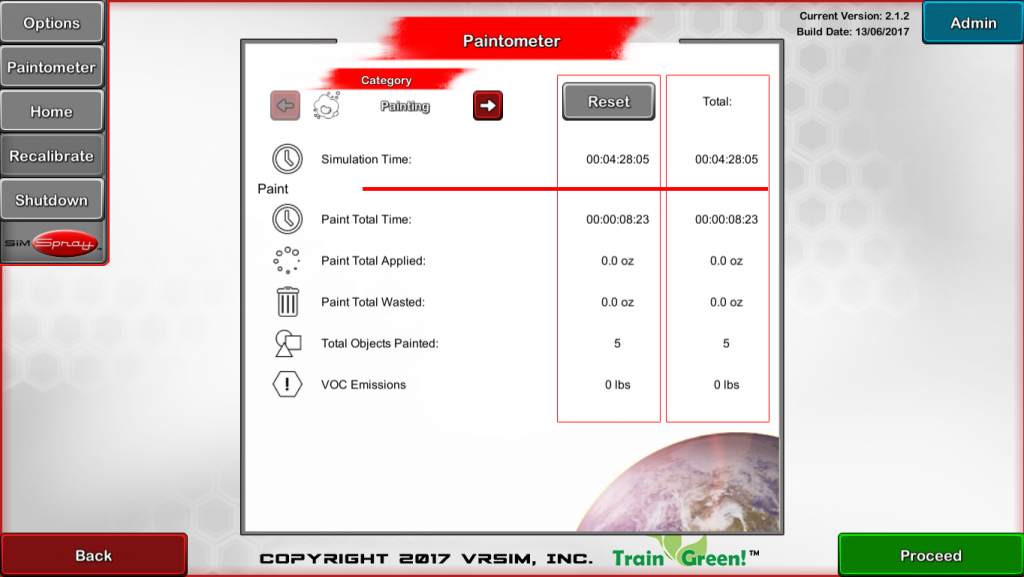
Press Reset to clear tracking related to that Product and begin a new tracking period, which continues until the Paintometer™ is Reset again.
The Paintometer™ Total tracks overall savings, and this continues to be tracked regardless of Resets. Totals shown are aggregated for all users.
SimSpray® motion tracking sensors may get confused under certain situations. When this happens, Users should Recalibrate the sensors.
Note: requires 3.x hardware. See Versions.
See Troubleshooting. Search for “Reset Space” and “Recalibrate” as well as other motion tracking recommendations.
Note: requires 2.x hardware. See Versions.
If you see the Recalibrate warning while in the Live Scene, you will need to Recalibrate.

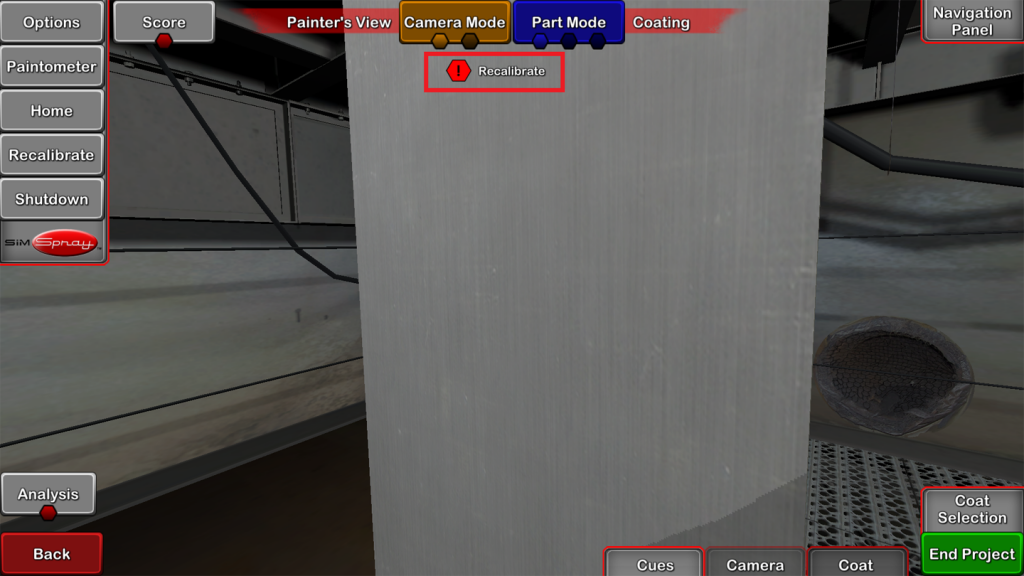
Additionally, if sensor calibration is uncalibrated or becomes unstable, Users looking through the FMD (Face Mounted Display) may experience the following symptoms in the Live Scene:
These conditions can occur for a variety of reasons including:
When the above conditions occur, Users should Recalibrate sensors.
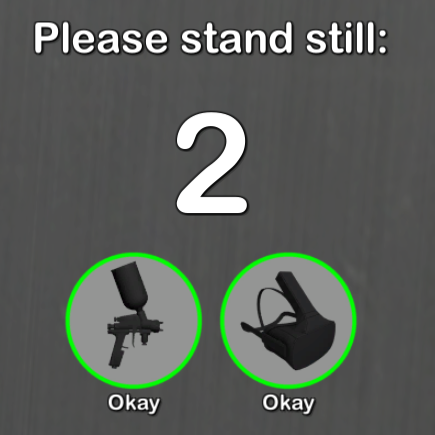
To Recalibrate Sensors:
As the system Recalibrates, you may see the following on the Touch Screen:
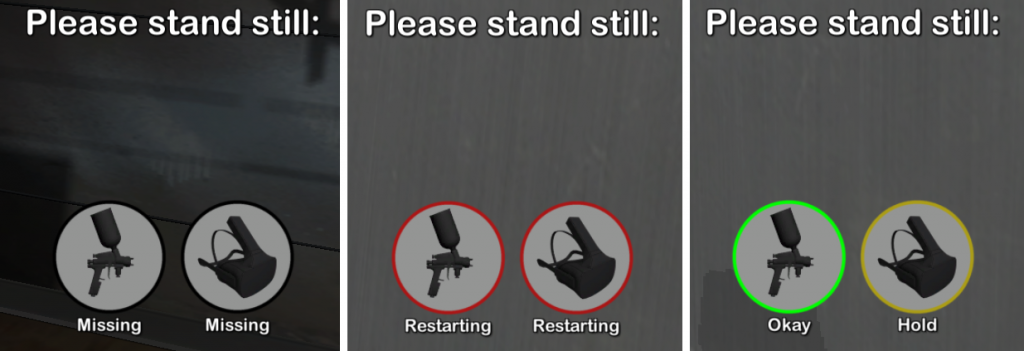
Note: If you see Hold, then please stand still. If that does not help, then step closer to the Tracker Stand.
Okay indicates that the Recalibrate was successful.
If Recalibration does not address these conditions, try:
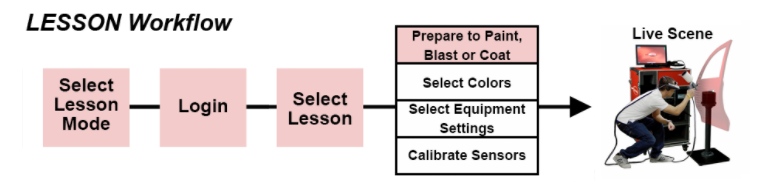
SimSpray® offers a variety of Modes (learning paths) to help users learn skills:

Not all Modes are available for all SimSpray® Products.
Users select the Mode they want to use from the Modes page. Tap the Proceed button on the Home page to access the Modes page. Then tap the Mode you want to select it, and tap the Proceed button.
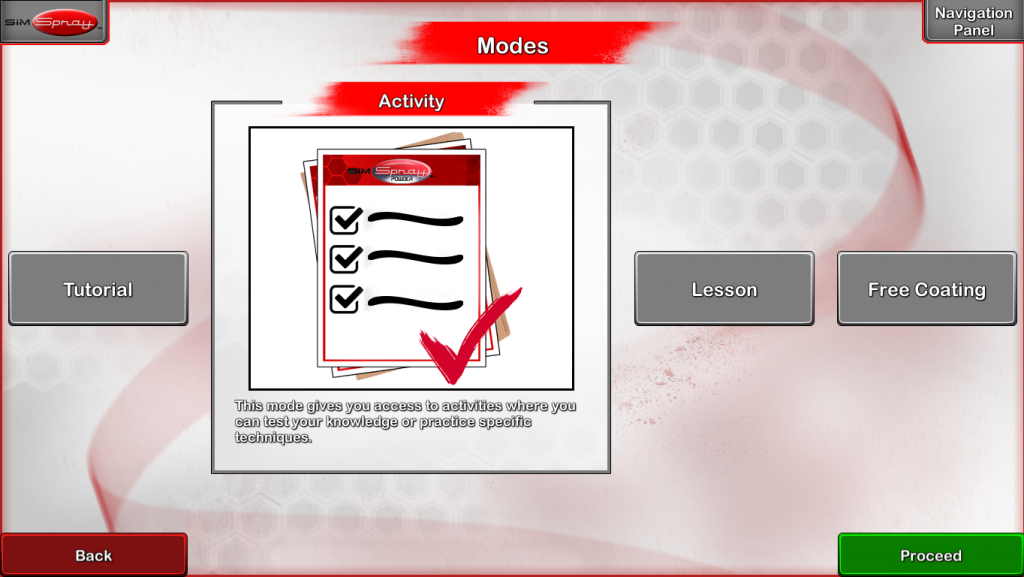
Note: Unavailable Modes are dimmed and cannot be selected.
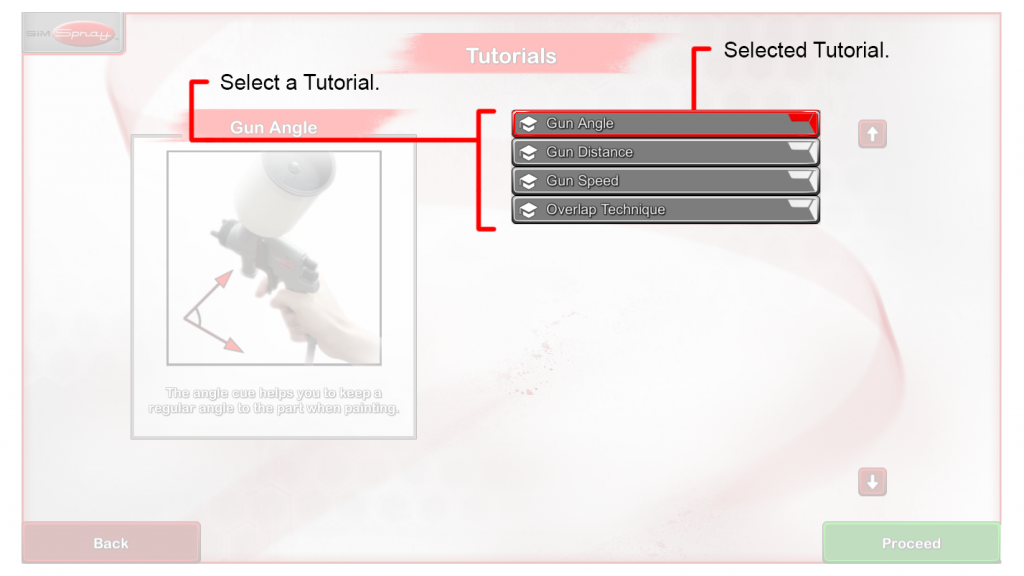
Tutorials are performed in Tutorial Mode or as Lessons in Lesson Mode.
The images below describe the workflows for Tutorials:
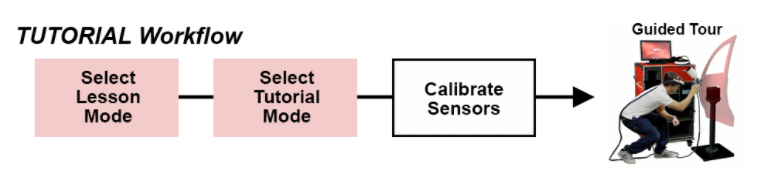
Or
Then:
Instructors may add Tutorials to Courses from the Content Management portion of the Admin Portal.
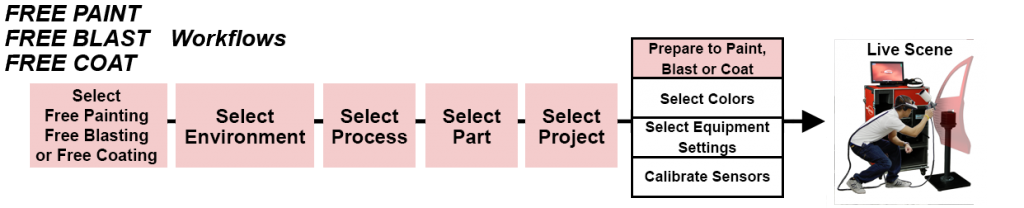
Activities are performed in Activity Mode or as Lessons in Lesson Mode.
The images below describe the workflows for Activities:
Or
Then:

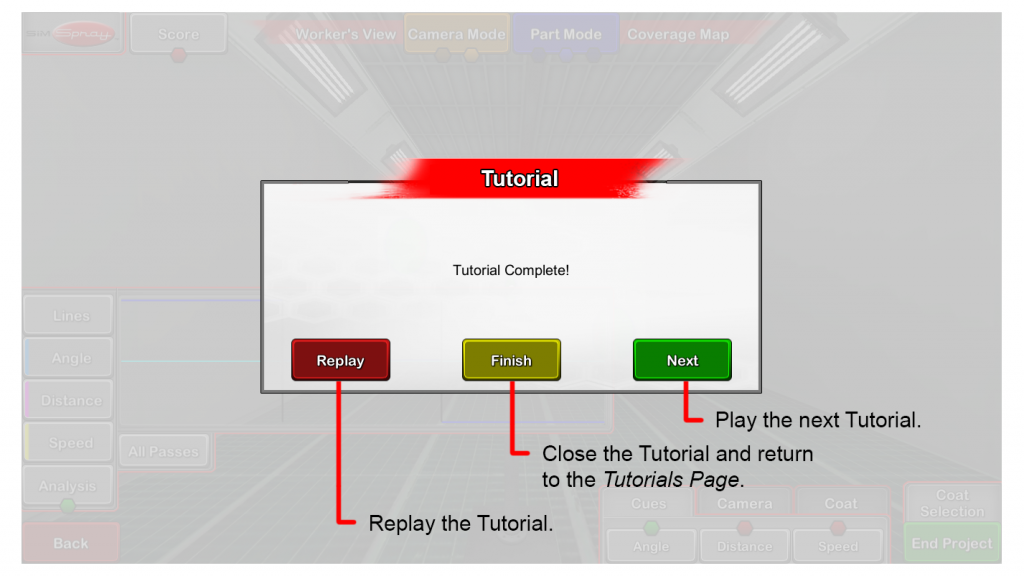
 Users will be guided in their FMD (Face Mounted Display) view to perform specific steps. Users must perform these steps to perform the Activity.
When Activities are complete, a Message Box appears in the FMD to prompt Users how to proceed. An Activity Score may also display, if applicable. Tap the Replay button to replay the Activity. Tap the Finish button to close the Activity and return to the Activities page. Tap the Next button to play the next Activity.
Instructors may add Activities to Courses from the Content Management portion of the Admin portal.