
All posts by vrsim
Quick Start Guide
v3.x
Note: requires 3.x hardware. See Versions.
SS3
Hygiene
See Hygiene and Disinfectant Guidelines.
Uncrating
(If your unit came in a crate.)
Unboxing
(If your unit came in a box.)
Quick Start Guide
v3.4.1
VIVE Pro 2
Valve Index
v3.4
VIVE Pro
v3.0.1-3.3.3
Blasting
For units with Blasting, attach the Blaster.
Loading Into a Vehicle
External Display
See Displaying to a TV or Projector.
HMD-Free Setup
See HMD-Free Setup.
Go
Hygiene
See Hygiene and Disinfectant Guidelines.
Quick Start Guide
v3.4.1
VIVE Pro 2
Valve Index
v3.4
VIVE Pro
v3.0.1-3.3.3
External Display
See Displaying to a TV or Projector.
Parts List
v3.2.1
Computer Diagram
Current (Laptop C)
Older (Laptop B)
Older (Laptop A)
HMD-Free Setup
See HMD-Free Setup.
Navigation tips:
- To download a PDF file, use the folder icon on the right side of the navigation bar.

- You can open and print the PDF document once it has been downloaded.
v2.x
Note: requires 2.x hardware. See Versions.
Positioning Your SimSpray® for Optimal Performance
v3.x
Note: requires 3.x hardware. See Versions.
See the Quick Start Guide.
Notes:
- The physical space needed can be set to a few defaults. See Room Shape in Tracking Options.
- Do not use SimSpray in a room with non-SimSpray VIVE base stations. Otherwise, the motion tracking may not work properly due to same frequency base stations.
- If motion tracking is jittery or intermittently tracking, minimize reflections or infrared interference. SimSpray uses a camera based tracking system. Try covering sources of IR (Infrared) interference, turning off infrared emitting devices, or repositioning or moving the system away from reflective surfaces.
v2.x
Note: requires 2.x hardware. See Versions.
The following guidelines will help you determine the best location for your SimSpray®:
The following image provides guidance on positioning your SimSpray® components while in use:

- Since SimSpray® uses a magnetic tracking system, it can be influenced by nearby magnetic fields. Keep SimSpray® away from objects or environments that can cause electromagnetic interference. Objects that may cause this include, but are not limited to:
- Fluorescent lights Note: you may need to turn off lights during SimSpray® operation.
- Ballasts
- Air handlers
- Generators
- Other magnetic tracking systems, such as nearby:
- SimSpray® units on the same or overlapping frequencies
- VRTEX™ units on the same or overlapping frequencies
- SimSpray® should not have conductive materials (e.g., aluminum, copper metals, metal beams in the walls or ceiling, or metal cabinets) within a minimum of an 8’ radius around the Tracker Stand.
- For best results, you will need an unobstructed 12’ wide (3.6576 m) x 11’ deep (3.3528 m) x 9’ (2.7432 m) high space to operate your SimSpray® in. This includes the space needed for the physical components and the minimum volume needed to move around and use your SimSpray®.
- Make sure to keep conductive materials at least 2’ (0.6096 m) away from the Gun and FMD during use.
- Keep the Stand away from any conductive materials in the floor.
- Keep the FMD, Gun, and Stand at least 5′ (1.524 m) away from any whiteboard or smartboard.
- If having trouble with motion tracking, reposition the Stand. If that does not work, try reorienting the Stand. Note: after adjusting the Stand, you will need to tap Recalibrate in hardware version 2.
- Position the Tracker Stand to the left of the Case to keep the Tracker Stand cables out away from the FMD (Face Mounted Display) and Gun cables and in a place that will allow the User to Paint, Blast, or Powder the Parts without straining the FMD and Gun cables. If necessary, an alternative orientation is to keep the Tracker Stand directly in front of the Case.
- The tracker stand may be moved or rotated slightly while in the Live Scene to accommodate the User and selected part. Note: You will need to tap Recalibrate in hardware version 2.
Motion Tracking Best Practices
v3.x
Note: requires 3.x hardware. See Versions.
See:
v2.x
Note: requires 2.x software. See Versions.
Best Practices
SimSpray® uses a magnetic tracking system for motion tracking.
- Follow the Positioning guide to best locate your unit and to understand about environmental influences on the fidelity of the motion tracking.
- If you have a nearby SimSpray® or VRTEX™ unit, these units may have overlapping frequencies with your unit:
- For Users with the 2nd Generation Tracker Stand (see Hardware Components), use the Frequency button to change frequencies.
- For all other Users, consider relocating this SimSpray® unit or your other SimSpray® or VRTEX™ units.
- For users with a v3 Case (see Hardware Components), to help reduce the need to Recalibrate:
- Keep the Gun drawer partially or fully pulled out.
- When not wearing the FMD, place the FMD on this drawer.
- When not holding the Gun, place the Gun on this drawer.
- If the motion tracking does not match your motions, use the Recalibrate button.
Troubleshooting
Uncalibrated or Unstable Calibration
Symptoms
If sensor calibration is uncalibrated or becomes unstable, the Recalibrate warning may display in the Live Scene.
Additionally, if sensor calibration is uncalibrated or becomes unstable, Users looking through the FMD (Face Mounted Display) may experience the following symptoms in the Live Scene:
- Users appear to be on, in, or under the floor.
- The Gun does not follow the path when the Users move it.
- When facing the physical Tracker Stand, Users do not see the Part in the FMD.
- When holding the physical Gun in front of them, Users do not see the Gun in the FMD.
- The Gun jumps to another position. This symptom typically occurs when the Gun moves from the front side of the stand to the back side of the Tracker Stand or vice versa.
- When standing in front of the Tracker Stand, your view in the FMD looks as though the virtual Part, environment, and Tracker Stand are rotated to the left or the right.
Causes and Solutions
- Follow the Best Practices above.
- Use the Recalibrate button.
Nearby Conductive Materials
Symptoms
- The Gun and/or FMD do not follow the path when the User moves them, especially when the Gun and/or FMD get close to nearby objects in the environment (e.g., metal walls, cabinets, or the floor).
Causes and Solutions
- Follow the Best Practices above.
- Follow the Positioning guide.
Electromagnetic Interference
Symptoms
If there is electromagnetic interference from the surrounding environment, the motion tracking may be degraded. Users looking through the FMD (Face Mounted Display) may experience the following symptoms in the Live Scene:
- The Gun or FMD appear to move slowly or rotate even though the physical devices are not being moved. This is normally an indication of other magnetic tracking systems in the same space.
- The Gun or FMD appear to jitter excessively during use. This is normally an indication of environmental interference.
- Even after using the Recalibrate button:
- The Gun or FMD do not follow the path the User moves and rotates them.
- The Gun or FMD keep jumping position. Users may appear to be on, in, or under the floor.
- The Gun or FMD quickly shift or slide even though the physical devices are moved smoothly.
- When standing in front of the Tracker Stand, your view in the FMD looks as though the virtual Part, environment, and Tracker Stand are rotated to the left or the right.
Causes
These conditions can occur if there is electromagnetic interference from the surrounding environment. The following are some potential sources of interference:
- Fluorescent lights
- Ballasts
- Air handlers
- Generators
- Other magnetic tracking systems, such as nearby:
- SimSpray® units on the same or overlapping frequencies
- VRTEX™ units on the same or overlapping frequencies
Solutions
When the above conditions occur, try the following:
- Change the Frequency.
- Relocate the SimSpray®, using the Positioning guide. Move the unit away from any potential causes of electromagnetic interference (see above).
- Turn off the lights.
Versions
Overview
Different SimSpray hardware and software versions exist. This website’s info is for v2.x and v3.x software and hardware.
Use this page to identify your versions.
Important: if you have v1.x software, go to SimSpray and locate “SimSpray® 1.0” for your documentation. The website you are currently on (support.simspray.net) does NOT have your documentation.
Hardware Versions
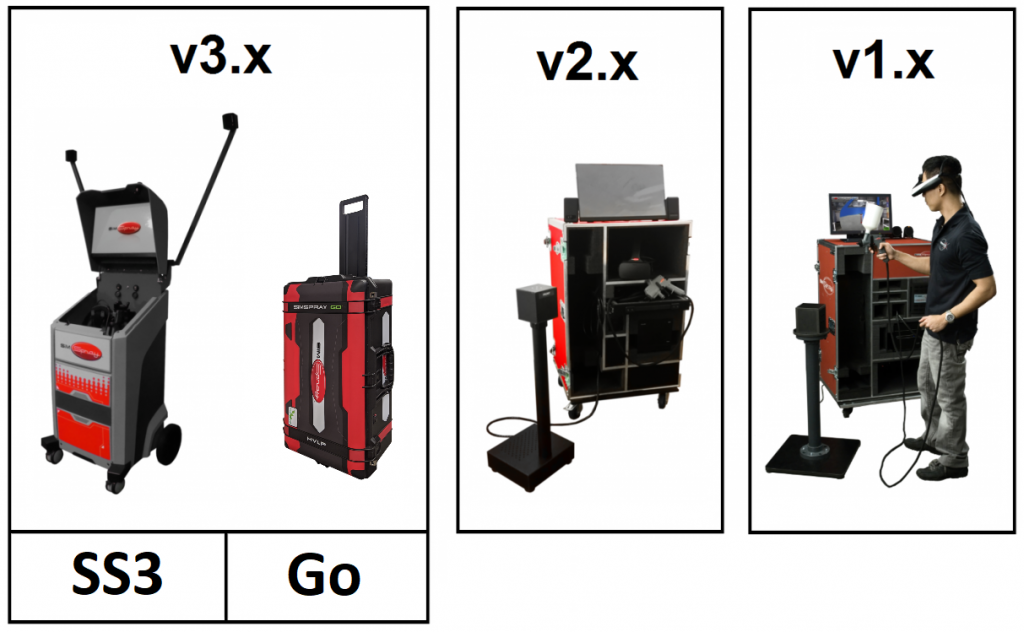
- v3.x hardware
- SS3
- Turnkey system with a VIVE Pro or VIVE Pro Eye HMD.
- Go
- Travel ready system with a VIVE Pro or VIVE Pro Eye HMD.
- SS3
- v2.x hardware
- Case with Sixense motion tracking and Oculus HMD.
- v1.x hardware
- Case with Polhemus motion tracking and Sony HMZ-T1 or eMagin dual input HMD.
Hardware versions are separate and distinct. Hardware from one version cannot be used on another version.
Software Versions
- v3.x software
- Compatible only with v3.x hardware.
- See the SimSpray website’s Updates section for some info about different subversions.
- v2.x software
- Compatible with v2.x hardware.
- Compatible with some v1.x hardware systems (Sony HMZ-T1 and powerful enough SimSpray computers).
- v1.x software
- Compatible only with v1.x hardware.
Each of these software lines is separate and distinct. (Note, however, that some v1.x hardware systems can be updated to v2.x software.)
Any numbers in place of “x” are part of the same line of software versions. For example, 2.0.72, v2.1.15, and v2.2.9 are all part of the v2.x software version line, while 3.0.2 and 3.1.0 are part of the v3.x software version line.
Locating Your Software Version
The software version is located on the main landing page.

To locate it, turn on your SimSpray system, set up your HMD (Head Mounted Display) when prompted, select a Product if prompted, and on the main landing page locate the number after Current Version. The full number is the software version. The digit(s) before the first period define(s) the software version line.
Example: “Current Version: 3.1.0” means you are on the 3.1.0 software version and the 3.x software line of versions.
Note: If there is no version number, you only see a build date, or the build date is before August 14, 2016, your software is on the v1.x line.
SimSpray® Hardware Components
v3.x
Note: requires 3.x hardware. See Versions.
SS3:

Each SimSpray® unit includes the following:
- Case
- Mobile case design with convenient, dedicated device storage and easy setup and tear-down procedure.
- Display
- Touch screen monitor with intuitive controls, and additional HDMI output for external displays
- Real-Time Tracking
- Integrated motion-tracking with easy-to-use deployment steps.
- HMD
- High-quality, immersive, and ergonomic professional-grade VIVE Pro Eye or VIVE Pro VR headset.
- Spray Equipment
- Realistic SimSpray spray gun, powder gun, and abrasive blasting hose with functional nozzles, triggers, or dials.
Note: Your SimSpray® unit may differ from the above image.
Go:
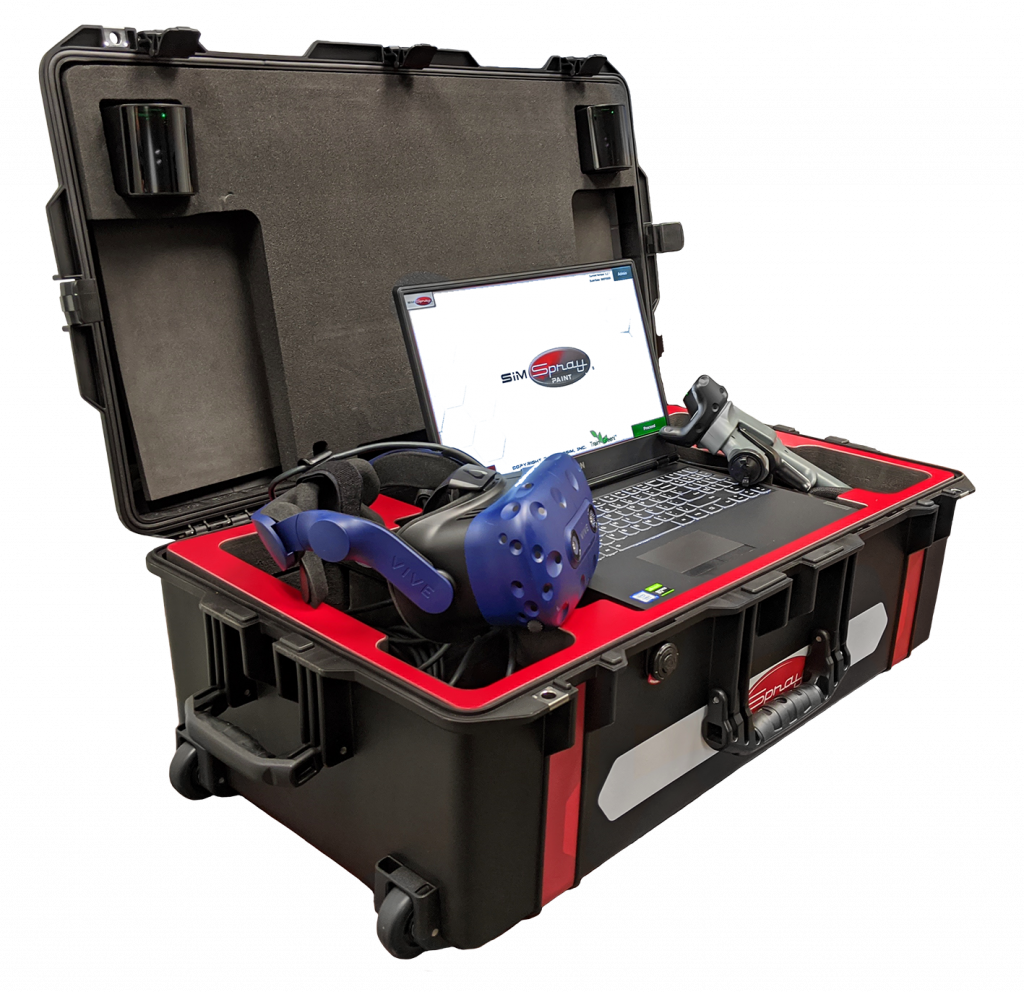
Each unit includes the following:
- Case
- Mobile case for easier travel. Dedicated device storage and easy setup and tear-down procedure.
- Display and input
- Laptop mousepad and keyboard. Intuitive controls, and additional HDMI output for external displays
- Real-Time Tracking
- Integrated motion-tracking with easy-to-use deployment steps.
- HMD
- High-quality, immersive, and ergonomic professional-grade VR headset.
- Spray Equipment
- Realistic SimSpray spray gun with functional nozzle, trigger, and dials.
Note: Your SimSpray® unit may differ from the above image.
v2.x
Note: requires 2.x hardware. See Versions.
Each SimSpray® bay includes the following components:
- Touch Screen Monitor
- Speakers
- Keyboard & Mouse
- Power Strip
- Accessories Box
Note: Your SimSpray® bay component model(s) may differ based on date and model purchased. Images are shown with most recent versions at top.
SimSpray® Case
Case Version 3
Images below show the front and back of the SimSpray® Case v3 as is packed for delivery. The Doors have been removed to show locations of key components.


Case Version 2
Images below show the front and back of the SimSpray® Case v2 as is packed for delivery. The Doors have been removed to show locations of key components.


SimSpray® Computer
The SimSpray® Computer runs the SimSpray® software and controls all other SimSpray® components.

SimSpray® FMD (Face Mounted Display)
The FMD is used to view the Part in the virtual Environment.
Oculus FMD
This FMD is an Oculus Rift with an added motion tracking sensor.

Sony FMD

SimSpray® Tracker Stand
The magnetic SimSpray® Tracker Stand tracks the User’s movements while in the Live Scene.
Tracker Stand – 2nd Generation

Tracker Stand – 1st Generation
![]()
SimSpray® Paint Guns
The custom SimSpray® spray Paint Gun is used to Paint the Part seen in the virtual Environment.
SimSpray® Spray Paint Gun – 2nd Generation

SimSpray® Spray Paint Gun – 1st Generation

SimSpray® Blast Gun
The custom SimSpray® Blast Gun is used to blast material from the Part seen in the virtual Environment.

SimSpray® Powder Coat Gun
The custom SimSpray® Powder Coat Gun is used to Powder Coat the Part seen in the virtual Environment.

Turning your SimSpray® On
v3.x
Note: requires 3.x hardware. See Versions.
See the Quick Start Guide.
v2.x
Note: requires 2.x hardware. See Versions.
- Follow the Positioning guide and follow the Quick Start Guide to set up your Case and Tracker Stand.
- Domestic Power Strip (USA/CAN/Mexico) (models may vary): Plug the Power Strip power cord into a standard 120v electrical outlet.
 International Power Strip (models may vary): Plug the power plug adapter found in the Accessories Box onto the end of the Power Strip power plug then plug the the Power Strip power cord into a standard electrical outlet.
- Turn the Power Strip on. The Power Strip is on when a green light is displayed on the Power Strip.
- Press the power button on the front of the Computer. The Computer is on when a blue light is displayed to the left of the power button.
- Wait for the SimSpray® to boot up.
Oculus FMD Customers
Sony T1 Customers
Setting Up Your VIVE HMD (Helmet)
v3.x
Note: requires 3.x hardware. See Versions.
These instructions apply to the SimSpray® VIVE Pro 2, VIVE Pro, or VIVE Pro Eye HMD (helmet).
- See the Quick Start Guide for normal setup.
- For making adjustments, see these abridged instructions from the VIVE Pro manual (8/3/18):
Note: SimSpray’s VIVE does not have or support headphones.
Navigation tips:
-
-
- To download a PDF file, use the folder icon on the right side of the navigation bar.
- You can open and print the PDF document once it has been downloaded.
- To download a PDF file, use the folder icon on the right side of the navigation bar.
-
Setting Up Your Valve Index HMD (Helmet)
v3.x
Note: requires 3.x hardware. See Versions.
These instructions apply to the SimSpray® Valve Index HMD (helmet).
- See the Quick Start Guide for normal setup.
- For making adjustments, see these abridged instructions from the Valve Index manual (6/20/23):
Note: SimSpray’s Valve Index does not have or support headphones.
Navigation tips:
- To download a PDF file, use the folder icon on the right side of the navigation bar.
- You can open and print the PDF document once it has been downloaded.
Setting Up Your Oculus FMD (Helmet)
v2.x
Note: requires 2.x hardware. See Versions.
These instructions apply to the SimSpray® Oculus FMD (helmet). You must set up your Oculus FMD to display 3D images properly.
- Turn your SimSpray® On.
- Perform the Steps displayed on the FMD Setup page.

- Tap the Proceed button to complete the setup process and continue to the Product Selection page.
Your SimSpray® is ready to use.