All posts by vrsim

Courses and Lessons

Courses

A Course is a group of Lessons.

Lessons

A Lesson is a Project with a Target Score assigned and the added ability to control which Visual Cues and Defects users have access to while performing the Lesson Project.  A Lesson exists as part of a Course.  


Default Courses

SimSpray comes with a robust set of Default Courses.  These Courses are available in Curriculum or Lesson Mode.  Default Courses are locked and cannot be changed.  Instructors may create Custom Courses and copy Default Courses to change Lesson content.

Custom Courses

Custom Courses are Courses created by an instructor.  Custom Courses act and look like Default Courses but are not locked.  Instructors can edit them.  Managing Custom Courses is done through the Admin Portal.  

The Courses and Lessons Page

To perform a Lesson use Curriculum or Lesson Mode and select a Lesson from the Courses and Lessons Page.

Default Courses List

Note: the below are dependent on the software version.  See Versions.

Navigation tips:

  • After clicking on the PDF you want, use the navigation bar on bottom, left.  
  • Click the download icon to download and print.
  • Click the up and down arrows to scroll through the document.

 v3.4

Note: requires 3.4 software.

  For SS3:

     Blast:

SimSpray Curriculum v3.3 - Blast 12-17-21

     Enterprise:

SimSpray Curriculum v3.4 - Enterprise 05-22-23

     Paint:

SimSpray Curriculum v3.3 - Paint 12-17-21

     Powder:

SimSpray Curriculum v3.3 - Powder 12-17-21

  For Go:

     Airless:

SimSpray Go Curriculum v3.3 - Airless 12-17-21

     Air-Assisted Airless:

SimSpray Go Curriculum v3.3 - Air-Assisted Airless 12-17-21

     HVLP:

SimSpray Go Curriculum v3.3 - HVLP 12-17-21

     Powder:

SimSpray Go Curriculum v3.3 - Powder 12-17-21

  Industry Content Packs:

     Automotive:

SimSpray Curriculum v3.3 - Automotive 12-17-21

     Building Trades:

SimSpray Curriculum v3.3 - Building Trades 12-17-21

     Furniture & Cabinetry:

SimSpray Curriculum v3.3 - Furniture & Cabinetry 12-17-21

     Rail:

SimSpray Curriculum v3.4 - Rail 05-22-23

     Structural:

SimSpray Curriculum v3.3 - Structural 12-17-21

 v3.3

Note: requires 3.3.1, v3.3.3, or v3.3.2 software.

  For SS3:

     Blast:

SimSpray Curriculum v3.3 - Blast 12-17-21

     Enterprise:

SimSpray Curriculum v3.3 - Enterprise 12-17-21

     Paint:

SimSpray Curriculum v3.3 - Paint 12-17-21

     Powder:

SimSpray Curriculum v3.3 - Powder 12-17-21

  For Go:

     Airless:

SimSpray Go Curriculum v3.3 - Airless 12-17-21

     Air-Assisted Airless:

SimSpray Go Curriculum v3.3 - Air-Assisted Airless 12-17-21

     HVLP:

SimSpray Go Curriculum v3.3 - HVLP 12-17-21

     Powder:

SimSpray Go Curriculum v3.3 - Powder 12-17-21

  Industry Content Packs:

     Automotive:

SimSpray Curriculum v3.3 - Automotive 12-17-21

     Building Trades:

SimSpray Curriculum v3.3 - Building Trades 12-17-21

     Furniture & Cabinetry:

SimSpray Curriculum v3.3 - Furniture & Cabinetry 12-17-21

     Structural:

SimSpray Curriculum v3.3 - Structural 12-17-21

 v3.2.1 and v3.2.2

Note: requires 3.2.1 or v3.2.2 software.

  For SS3:

  • Courses and lessons are unchanged from v3.2.0.  See v3.2.0.

  For Go:

SimSpray Go Default Courses v3.2.1 08-19-20

 v3.2.0

Note: requires 3.2.0 software.   Note these files also contain Geometric Parts, available as an update for v3.0 and v3.1 for eligible customers.

SimSpray Default Courses v3.2 04-01-20

 v3.1

Note: requires 3.1.x software.

SimSpray Default Courses v3.1 08-16-19

 v2.x

Note: requires 2.x software.

SimSpray Default Courses - All Products

Projects and Coats

Projects give Users the ability to practice scenarios they are likely to encounter in real world situations. A Project defines the Equipment Settings and Technique Parameters to properly Paint, Blast or Powder Coat a single Part and Process.

Note: Equipment Settings are meant to expose Users to proper settings.  With the exception of some tip sizes, changing the settings does not change how the paint or powder goes down in the Live Scene.  For Powder Coating, you can use Faraday Mode in the Live Scene to change how the powder is applied.

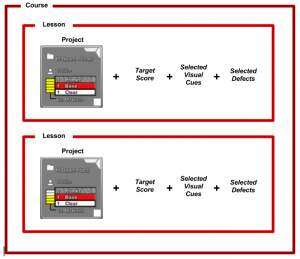
A Project is also the foundation for any Lesson. Projects are accessed as Lessons in Lesson Mode or through Free Paint, Free Blast or Free Coat Modes.

Default Projects

SimSpray™ comes with a robust set of Default Projects.  These Projects are available through Free Paint, Free Blast and Free Coat Modes  and are the foundation for the Default Lessons available in Lesson Mode.  

Default Projects are locked and cannot be changed.

Instructors may create custom Lessons from Default Projects or copy Default Projects to change Project settings in the Content Management portion of the Admin portal.

Custom Projects

Custom Projects are Projects created by an Instructor.  Custom Projects act and look like Default Projects but are not locked.  Instructors can edit them.  Managing Custom Projects is done through the Admin portal.  

Projects for Different Products

Normal Projects are performed in a stationary virtual environment (in the Live Scene) like a paint booth or paint shop where the User is required to move around the part, or workpiece, to complete the project.  Normal Projects are available with the SimSpray™, SimSpray™ Industrial, and SimSpray™ Powder products.

Conveyor Projects are performed in a virtual conveyor environment (in the Live Scene), like a manufacturing plant where the User is required to perform the project on the part, or workpiece, as it moves in front of the User.  Conveyor Projects are available with the SimSpray™ Industrial and SimSpray™ Powder products.

Painting Projects

The following is an example of a Painting Project.  This example shows a Project with 4 Paint Coats and Equipment Settings related to each Coat of the Painting process.  
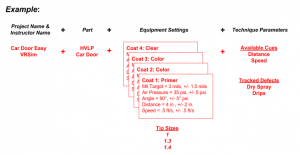
Paint Coats

Each Coat is a layer of Paint.  There are three types of Coats:  Primer, Color and Clear.  There can be multiple Paint Coats in a Project.

Paint Coat Settings

Each Paint Coat has specific Settings that define the application and scoring parameters for the Coat.

Each technique parameter (angle, distance, speed, mil build) is assessed based on an ideal Value and an acceptable Range.  For Custom Projects, these Values and Ranges can be seen and adjusted in the Content Management portion of the Admin Portal.

Blasting Projects

SimSpray™ provides 3 Blast Projects providing Users the ability to practice cleaning Parts while managing Part damage.   Each Project uses a different blasting media:

  1. Easy Project – Sodium Bicarbonate
  2. Intermediate Project – Garnet
  3. Hard Project – Steel Grit

Blast Projects are accessible in the Content Management portion of the Admin Portal.

Blast Settings

Blast Projects have specific Settings that define the application and scoring parameters for the Coat.

Blast Project settings cannot be changed.

Powder Coating Projects

SimSpray™ offers a variety of Powder Coat Projects providing Users the ability to practice Powder Coating Parts.   

Paint Coat Settings

Each Powder Project has specific Settings that define the application and scoring parameters for the Project.

Each technique parameter (angle, distance, mil build) is assessed based on an ideal Value and an acceptable Range.  These Values and Ranges can be seen and adjusted in the Content Management portion of the Admin Portal.

Default Paints List

Default Paint and Material Settings are specific to each SimSpray™ software version.  See Versions.

Navigation tips:

  • After clicking on the PDF you want, use the navigation bar on bottom, left.  
  • Click the download icon to download and print.
  • Click the up and down arrows to scroll through the document.

 v3.3+

Note: requires 3.3.x or 3.4.y software. 

Paint and Material Settings – Imperial

SimSpray Paint and Material Settings - Imperial 12-17-21

Paint and Material Settings – Metric

SimSpray Paint and Material Settings - Metric 12-17-21

Paint Difficulty Tolerances – Imperial and Metric

SimSpray Paint and Material Settings - Difficult Variances - Imperial & Metric 05-16-22

 v3.2.1 or earlier

See Default Project List instead.

Default Projects List

Default Projects are specific to each SimSpray software version.  See Versions.

Navigation tips:

  • After clicking on the PDF you want, use the navigation bar on bottom, left.  
  • Click the download icon to download and print.
  • Click the up and down arrows to scroll through the document.

 v3.3

Note: requires 3.3.1 or 3.3.2 software. 

See Default Paints List instead.

 v3.2.1

Note: requires 3.2.1 software. 

  For SS3:

  • SS3’s settings are unchanged from v3.2.0.  See v3.2.0.

  For Go:

Imperial

SimSpray 3.2.1 Go - Default Project Settings Sheet - Imperial 08-19-20

Metric

SimSpray 3.2.1 Go - Default Project Settings Sheet - Metric 08-19-20

 v3.2.0

Note: requires 3.2.0 software.   Note these files also contain Geometric Parts, available as an update for v3.0 and v3.1 for eligible customers.

Imperial

SimSpray 3.2 Default Project Settings Imperial 04-01-20

Metric

SimSpray 3.2 Default Project Settings Metric 04-01-20

 v3.1

Note: requires 3.1.x software.

Imperial

SimSpray 3.1 - Default Project Settings Sheet Imperial 08-27-19

Metric

SimSpray 3.1 - Default Project Settings Sheet Metric 08-27-19

 v3.0

Note: requires 3.0.x software.

SimSpray 3.0 - Default Project Settings 05-29-19

 v2.2

Note: requires 2.2.x software.

SimSpray 2.2.8 - Default Project Settings Sheet 12-03-18

 v2.1 or v2.0

Note: requires 2.1.x or 2.0.x software.

Equipment Settings - All

SimSpray™ Navigation

The SimSpray™ operates with a Touch Screen Monitor. Most User Interface pages have both a Back button and a Proceed button that help Users navigate along a path.

The Navigation Panel located in the top, right corner builds a breadcrumb trail of pages visited so Users can easily jump to any of them.
The Home option under the SimSpray™ tab takes Users to the Home screen.

Arrow buttons are available to scroll through available options.

Toggle buttons are available to turn specific options ON or OFF. 

Options

Note: the options you have available may differ depending on your software version.

Language

Select from the following languages:

  • EN (English)
  • FR (French)
  • PL (Polish)
  • RU (Russian)
  • ES (Spanish)
  • DE (German)

Volume

Adjust the Volume for the following items:

  • Interface (the user interface, such as the sound of pressing buttons)
  • Gun (sound of air, paint, powder, or blast media coming from the gun)
  • Environment (background sounds in the virtual environment)

Date Format

Toggle among different date formats.

Time

Toggle among different time formats.

Room

Note: requires 3.x software.

Toggle among different room shapes for smaller or larger motion tracking zones.  See Tracking Options.

Units

Toggle among different time formats, imperial or metric.

Vibration

Toggle on or off the gun vibration when the gun is triggered.

Bounds

Note: requires 3.x software.

Toggle showing the room shape bounds in the HMD (Head Mounted Display).  When you are wearing your HMD in the motion tracked zone and get to the edge of the zone, blue line grids appear, indicating the edge of the motion tracked zone.

Paintometer™ ROI Calculator

The Paintometer™ tracks time and environmental savings realized through usage of all SimSpray™ Products.  This information can also help you calculate your ROI (Return on Investment) from using SimSpray™.

To access the Paintometer™, select the SimSpray menu, and select Paintometer™.

v3.x

Note: requires 3.x software.  See Versions.

Basic Mode

To view a summary of usage for a Product, select Basic Mode, and then select a Product.

Advanced Mode

To see more detailed data for time total, material used, parts used, and per part info, select Advanced Mode.  Then click on the tabs at left.  Use available arrows to see all available info.

Lifetime vs. Trip

Lifetime tracks overall savings, and this continues to be tracked regardless of Resets.  Totals shown are aggregated for all users.  Select Lifetime to see this info.

Trip tracks until Reset is used.  Select Trip and press Reset to clear tracking related to that Product and begin a new tracking period.  This period will continue until the Paintometer™ is Reset again.   

Custom Unit Costs

To customize the cost amounts from the defaults, select Show unit costs.  Select any unit cost, a number entry will appear, enter a value, and confirm with the green, checkmark button.

Select Hide unit costs to hide the unit costs.

Export Data

Connect a USB flash drive at the front of the SimSpray unit, and click Export Data to export the Basic Mode’s summary of information.  This info can be imported into a spreadsheet program on a non-SimSpray computer.

Exiting

Press Back to exit the Paintometer™.

v2.x

Note: requires 2.x software.  See Versions.

Select a Product Category to view tracked usage for that Product.

Reset

Press Reset to clear tracking related to that Product and begin a new tracking period, which continues until the Paintometer™ is Reset again.

The Paintometer™ Total tracks overall savings, and this continues to be tracked regardless of Resets.  Totals shown are aggregated for all users.

Recalibrate

SimSpray motion tracking sensors may get confused under certain situations.  When this happens, Users should Recalibrate the sensors.

v3.x

Note: requires 3.x hardware.  See Versions.

See Troubleshooting.  Search for “Reset Space” and “Recalibrate” as well as other motion tracking recommendations.

v2.x

Note: requires 2.x hardware.  See Versions.

Symptoms of Uncalibrated or Unstable Calibration

If you see the Recalibrate warning while in the Live Scene, you will need to Recalibrate.

Additionally, if sensor calibration is uncalibrated or becomes unstable, Users looking through the FMD (Face Mounted Display) may experience the following symptoms in the Live Scene:

  • Users appear to be on, in, or under the floor.
  • The Gun does not follow the path when the Users move it.
  • When facing the physical Tracker Stand, Users do not see the Part in the FMD.
  • When holding the physical Gun in front of them, Users do not see the Gun in the FMD.
  • The Gun jumps to another position.  This symptom typically occurs when the Gun moves from the front side of the stand to the back side of the Tracker Stand or vice versa.
  • When standing in front of the Tracker Stand, your view in the FMD looks as though the virtual Part, environment, and Tracker Stand are rotated to the left or the right.

Causes of Uncalibrated or Unstable Calibration

These conditions can occur for a variety of reasons including:

  • The FMD, Gun and/or Tracker Stand come too close to metal.
  • The FMD and/or Gun are moved outside the recommended Painting, Blasting, or Coating area range.
  • The FMD and/or Gun are located behind the Tracker Stand when calibration takes place.

Solutions to Uncalibrated or Unstable Calibration

When the above conditions occur, Users should Recalibrate sensors.

To Recalibrate Sensors:

  1. Stand in front of the Tracker Stand, while wearing the FMD and holding the Gun.
  2. Tap the SimSpray™ tab and then tap Recalibrate.
  3. Follow the onscreen instructions to Recalibrate sensors.

As the system Recalibrates, you may see the following on the Touch Screen:

Note: If you see Hold, then please stand still.  If that does not help, then step closer to the Tracker Stand.

Okay indicates that the Recalibrate was successful.

If Recalibration does not address these conditions, try:

  1. Relocating the SimSpray, using the Positioning guide.
  2. Changing the motion tracker’s Frequency.